Uncategorized
How to Set Up a Student Science Lab at Home
How to Set Up a Student Science Lab at Home
Creating a student science lab at home is an excellent way to foster curiosity, spark creativity, and engage in hands-on learning. Whether you’re homeschooling, supporting your child’s learning, or simply looking for a fun and educational way to explore science, a home science lab can be a valuable resource. Setting it up doesn’t have to be expensive or complicated; all you need is the right equipment and a little space.
In this guide, we’ll walk you through the steps of setting up a student science lab at home, from choosing the right tools to ensuring safety and organization.

Step 1: Choose a Safe and Suitable Location
The first thing to consider is where you will set up the lab. Ideally, this should be a space that can easily be cleaned and won’t be prone to spills or accidents. Here are a few options:
- A spare room: If you have an unused bedroom or office, this could be converted into a lab.
- A garage or basement: These spaces are great for experiments that may get messy.
- A kitchen counter or dining table: If you’re working with basic tools and experiments, a kitchen or dining area might suffice.
Make sure the location is well-ventilated and free from distractions. Additionally, ensure it is far from items that could be damaged by chemicals or other lab materials.
Step 2: Gather the Essential Science Lab Equipment
Once you’ve chosen a location, the next step is to gather the necessary tools and equipment. The goal is to have enough supplies for common science experiments without overloading on unnecessary items. Here’s a list of essential equipment to get started:
Basic Equipment for Your Home Science Lab
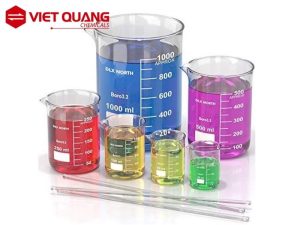
- Glassware (Beakers, Flasks, Test Tubes)
- Use: Mixing, heating, and storing liquids.
- Recommendation: Opt for durable glassware that is easy to clean and reusable. You can also find plastic alternatives, but glass is safer for many chemical reactions.
- Measuring Tools
- Use: Accurate measurements of liquids and solids.
- Items: Graduated cylinders, measuring cups, and spoons.
- Recommendation: Invest in a good set of plastic or glass graduated cylinders for precise measurements.
- Safety Equipment
- Use: Protecting yourself during experiments.
- Items: Lab coat, safety goggles, and gloves.
- Recommendation: Always wear gloves and goggles when working with chemicals or heated materials.
- Bunsen Burner or Heating Source
- Use: Heating substances for experiments.
- Recommendation: If a Bunsen burner isn’t an option, consider using a simple electric heating pad or a stove.
- Thermometers
- Use: Measuring temperature for experiments.
- Recommendation: Digital thermometers are easy to read and more accurate than traditional mercury thermometers.
- pH Testing Kit
- Use: Measuring the acidity or alkalinity of liquids.
- Recommendation: A simple pH paper or digital pH meter will suffice for most student experiments.
- Petri Dishes and Culture Plates
- Use: For growing bacteria or observing biological samples.
- Recommendation: These are great for biology experiments and can be used to culture safe, non-toxic organisms.
- Plastic or Wooden Stirring Rods
- Use: Stirring liquids and substances.
- Recommendation: Wooden or plastic rods are safe for most experiments and are easy to clean.
- Funnels and Strainers
- Use: Pouring liquids or filtering substances.
- Recommendation: Plastic funnels are durable and easy to clean, while fine mesh strainers are useful for separating solid substances.
- Lab Notebook
- Use: Documenting observations, results, and procedures.
- Recommendation: Keep a dedicated notebook to track your experiments, findings, and hypotheses. This promotes good scientific practice and helps to organize your work.
- Scales or Balances
- Use: Weighing solids and liquids.
- Recommendation: A small digital scale is perfect for measuring ingredients for experiments.
- Plastic Storage Containers
- Use: Storing materials and organizing tools.
- Recommendation: Clear plastic containers make it easy to keep your lab organized and accessible.
Step 3: Organize Your Lab Space
A well-organized lab space helps prevent accidents and makes it easier to access tools and materials. Here are some tips for organizing your home science lab:
- Work Surface: Ensure you have a sturdy, flat work surface. A table or desk that can withstand spills and is easy to wipe down is ideal.
- Storage: Use plastic bins, drawers, or shelves to store lab equipment, chemicals, and tools. Label everything so you can find what you need quickly.
- Safety Zone: Have a dedicated space for safety equipment like goggles, gloves, and lab coats. Keep it separate from other tools and materials.
- Lighting and Ventilation: Make sure your lab space is well-lit and has good airflow. Open a window or use an exhaust fan if necessary.
Step 4: Start With Simple Science Experiments
With your home lab set up, you’re ready to start experimenting! Here are a few simple experiments that can be done with basic equipment:
- Baking Soda Volcano: Create a fun chemical reaction with vinegar and baking soda to observe the release of carbon dioxide gas.
- Plant Growth Experiment: Use a magnifying glass or microscope to study how different conditions affect plant growth.
- Water Filtration: Create a simple filtration system using sand, charcoal, and gravel to demonstrate how water can be purified.
You can find many other experiments online or in science activity books. The important thing is to ensure that the experiments are safe and appropriate for the age and skill level of the student.
Step 5: Maintain Safety Standards
Safety is the most important aspect of any home science lab. To ensure safety, follow these guidelines:
- Supervision: Always supervise young children when conducting experiments, especially those that involve heat, chemicals, or sharp objects.
- Clean as You Go: Keep your lab tidy by cleaning up after each experiment. This reduces the risk of accidents and keeps your materials in good condition.
- Read Labels: Always read the labels of any chemicals or materials you use. Make sure they are non-toxic and suitable for student use.
- Proper Disposal: Dispose of materials like chemicals, biological samples, and waste properly. Check local guidelines for safe disposal methods.
Step 6: Expand Your Lab Over Time
As your student’s interest in science grows, you can expand your home lab with more advanced equipment:
- Microscope: Perfect for studying tiny organisms and cells.
- Centrifuge: Useful for separating different substances based on density.
- Chemistry Set: For more complex chemical experiments.
By expanding the lab as your student’s understanding of science deepens, you can continue to foster a love of learning and exploration.

Conclusion
Setting up a student science lab at home is an exciting and educational project that encourages hands-on learning, critical thinking, and curiosity. With the right tools, safety measures, and organization, you can create an inspiring space that fosters scientific discovery and exploration. Whether you’re conducting simple experiments or building advanced projects, a well-equipped home lab will provide valuable educational experiences for students of all ages.
At Glowtopis.com, we offer a variety of affordable and safe lab supplies for students to help you build the perfect home science lab. Explore our selection and get started on your next experiment today!

